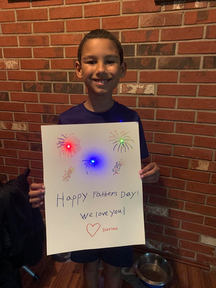
 This week’s STEAM Star is Dorian Maglioccowho will be a fourth grader at Lincoln-Douglas Elementary School. Doriancreated a paper circuit Father’s Day card that incorporates science, technology, and art. Thank you Dorian for creating this fun activity for us! How does an electrical circuit work?Electricity can be found everywhere you look. Electrical circuits are used to power light bulbs, televisions, computers, and more! Circuits are a simple, fascinating way to better understand building and engineering. To create a simple circuit, you will need a battery, wire, and a light. For this project, you will be using a three-volt lithium button battery. This battery should have the positive and negative sides clearly labeled. You will also be using 5mm LEDs (or Christmas lights) that will each have two pins. The slightly longer pin is the positive end and the slightly shorter pin is the negative end. To ensure that the LED will light-up, the negative end of the battery must be connected to the negative end of the LED and the positive end of the battery must be connected to the positive end of the LED. This allows for the electrons to flow properly throughout your circuit from the battery to the light.
Material List: Card stock paper, markers, and craft supplies Copper wire* Scissors 3v lithium button battery 5mm LEDs of assorted colors Instructions: 1. Before constructing your circuit, test your 5mm LED to ensure that it works. Place the negative LED pin on the negative end of the 3v lithium button battery and the positive LED pin on the positive end of the battery. If the LED lights up, you are ready to move forward with building your closed circuit. If your LED does not light up, test other LEDs and batteries until your LED lights up. 2. Once your LED is lighting up, design your card using markers, stickers, paint, glitter, and more. Be creative with your card! Your lights could be the candle on a birthday cake, stars in the sky or even provide the sparkle to a light saber or magic wand! Dorian created fireworks with his lights, which are a fun theme for Father’s Day, the 4th of July and more! 3. Now it’s time to get building. Cut and place two copper wires of equal length on the card stock in a path of your choosing. 4. Connect each LED pin to one wire. Do not allow the two LED pins to touch each other once they are connected or else the light may get short-circuited. This means that heat energy is released and causes damage to the circuit or overheating. 5. Place your button battery on the opposite end of the wires. Then attach it to the wires, making sure the positive end of the LED flows to the positive end of the battery and the negative end of the LED flows to the negative end of the battery.This connection closes the circuit and allows for the LED to light up. The button battery provides power and energy to the circuit which causes the electrons to flow. This is an example of a simple circuit, meaning that the light has a direct connection to the battery.
0 Comments
Leave a Reply. |
Archives
June 2024
Categories |

 RSS Feed
